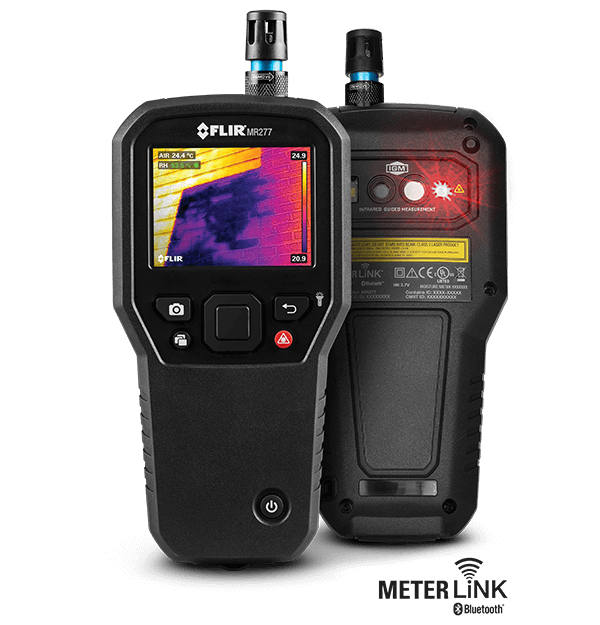
The FLIR MR277 is an advanced moisture meter that combines infrared imaging with moisture-sensing technology to help you identify potential moisture issues in your home. It is especially useful for detecting hidden water damage, leaks, mold growth, and humidity problems. Here’s a guide on how to use the FLIR MR277 effectively for moisture detection in your home:
- Understand the Features of the FLIR MR277
Before starting, familiarize yourself with the FLIR MR277’s key features:
- Infrared Guided Measurement (IGM) Technology: This feature uses a thermal camera to detect temperature anomalies that may indicate moisture presence.
- Pinless Moisture Sensor: Allows non-invasive moisture detection beneath the surface of materials like walls, floors, and ceilings.
- External Pin Probe: Provides more precise moisture readings, especially useful for wood and other porous materials.
- Environmental Sensors: Measure parameters like temperature and humidity, helping to detect conditions conducive to mold growth.
- Preparing the Device
- Power on the FLIR MR277 and allow the device to calibrate. Calibration ensures that temperature and moisture readings are accurate.
- Familiarize yourself with the display and controls. The thermal image, moisture readings, and environmental data will appear on the screen.
- Inspecting for Moisture with Thermal Imaging
Thermal imaging is a powerful feature of the FLIR MR277 that helps you spot temperature differences in materials, which can indicate moisture.
- Start with thermal scans: Move the device slowly across areas you suspect may have moisture issues (walls, ceilings, floors, windows). Look for cold spots or temperature anomalies that stand out from the rest of the surface.
- Common areas to inspect:
- Around windows and doors (potential for leaks)
- Ceilings (especially under bathrooms or rooflines for leaks)
- Basements and foundations (check for water seepage)
- Areas around plumbing fixtures like sinks, showers, and toilets
- Focus on anomalies: If the thermal camera shows a cooler spot, this could indicate moisture buildup. Keep in mind that thermal imaging does not directly detect moisture, but it highlights areas where further investigation is needed.
- Using the Pinless Moisture Sensor
Once thermal imaging has identified areas of interest, use the pinless moisture sensor to confirm the presence of moisture. The pinless sensor allows you to check moisture levels without damaging surfaces.
- Place the sensor on the surface: Hold the device flat against the area where you suspect moisture. The moisture reading will appear on the screen.
- Monitor the readings: The FLIR MR277 will show moisture content as a percentage. Compare this to the normal moisture levels for the material you’re testing (wood typically has lower moisture tolerance than drywall).
- Check multiple areas: Move the sensor around the suspect area to map out the extent of the moisture problem.
- Using the Pin Probe for Precise Readings
For more accurate moisture measurements, especially in wood or deeper into the surface, use the external pin probe.
- Insert the pin probe: Gently insert the probe into the surface. The pins should penetrate the material to get a moisture reading below the surface.
- Take readings: The moisture levels will appear on the screen. Pin readings are typically more precise than the pinless sensor, so this is helpful for verifying suspected moisture problems.
- Use in key areas: The pin probe is particularly useful around baseboards, window sills, and wooden framing, where moisture could be absorbed deeply into materials.
- Monitoring Environmental Conditions
The FLIR MR277 includes environmental sensors for temperature and humidity, which help assess the conditions in your home that could lead to moisture problems or mold growth.
- Measure humidity: Check for elevated humidity levels, especially in basements, bathrooms, and kitchens where moisture is more likely to accumulate. A relative humidity above 60% can create conditions conducive to mold growth.
- Check temperature gradients: Use the device to measure temperature variations across rooms, which can help identify areas prone to condensation (e.g., cold spots near poorly insulated walls).
- Analyzing and Documenting Findings
Once you’ve gathered data using thermal imaging, moisture sensors, and environmental readings, you can analyze the results:
- Thermal imaging: Review the temperature variations you captured to determine whether there’s a pattern of cold spots indicating moisture.
- Moisture readings: Compare the moisture percentages to typical ranges for the material (e.g., wood should generally have a moisture content below 12-15% in normal conditions).
- Environmental factors: If humidity levels are high or temperatures favor condensation, consider measures to improve ventilation or insulation.
- Taking Action Based on Results
Once moisture is detected, it’s important to address the underlying cause:
- Repair leaks: If you identified moisture near plumbing fixtures, windows, or the roof, investigate the source and arrange for repairs.
- Improve ventilation: For areas with high humidity (bathrooms, kitchens), consider installing better ventilation or using dehumidifiers.
- Mitigate mold risks: In areas where moisture and humidity are high, take steps to prevent mold growth by drying out the space and cleaning with mold-inhibiting solutions.
- Regular Monitoring
Regularly using the FLIR MR277 for moisture detection can help you stay ahead of potential issues. Periodic checks of areas prone to leaks or moisture buildup (like basements or bathrooms) will allow you to identify problems before they become serious.
Conclusion
The FLIR MR277 is a powerful tool for detecting moisture in your home, combining thermal imaging and moisture-sensing technology. By regularly using this device to inspect for leaks, poor insulation, and high humidity, you can prevent water damage, reduce mold risk, and maintain a healthy indoor environment.